


Ribbing Calculator: If you’re comfortable with sewing using commercial patterns but crave more personalization, challenges like adding neckbands and ribbing can arise. This seemingly simple task becomes complex when different fabrics yield different results. Fear not! This article aims to equip you with the Ribbing Calculator, empowering you to calculate neckband length effortlessly and tackle your sewing projects with confidence.
Table of Contents
Understanding the Importance of Proper Ribbing Measurement
Ribbing isn’t just about looks; it’s a multitasking marvel. It gives a professional finish to your DIY stretch clothes, ensuring they look just as polished as store-bought garments. What’s more, it adds essential stretchiness to the neckhole, cuffs, or wherever it’s applied, ensuring freedom of movement without losing shape over time. It’s the secret ingredient that reserves just the right amount of stretchiness where you need it most.
Understanding How Neck Ribbing Works
A neck ribbing isn’t just a simple rectangle you attach to the neckline. It’s much more complex than that! Picture this: your neckline is a gentle curve, but your ribbing is a straight piece of fabric. To make it fit seamlessly, you need to encourage that ribbing to conform to the curve of the neckline. The outer edge of the ribbing, where it joins the fabric, needs to be longer than the inner edge to accommodate the longer circumference. That’s where the magic of elastic fabric comes into play. Ribbing made from stretchy material can stretch to match the outer measurement while staying put once sewn into place.
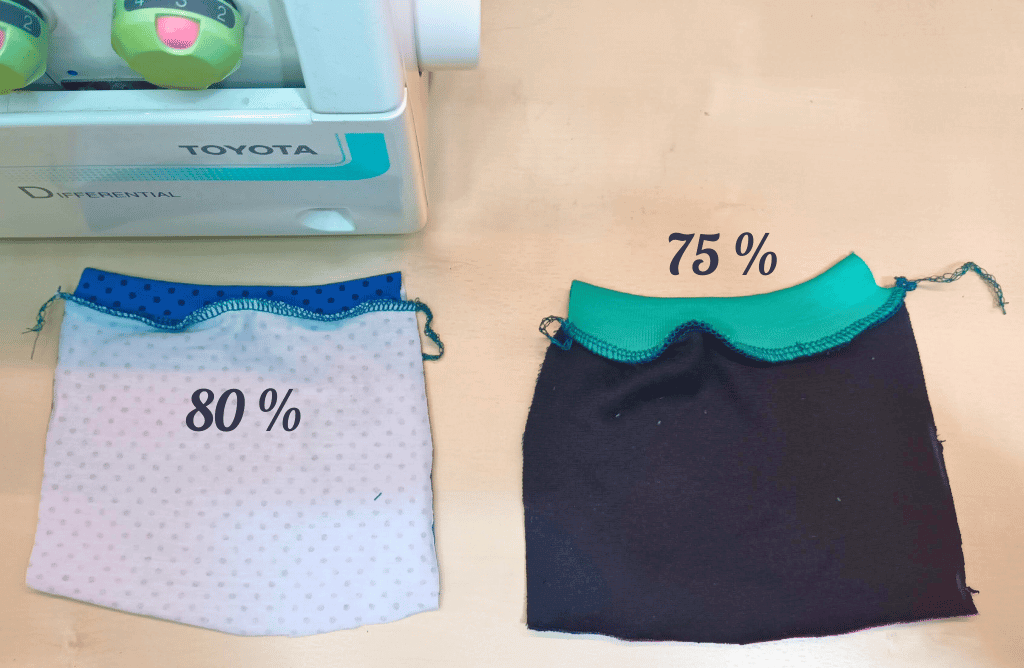
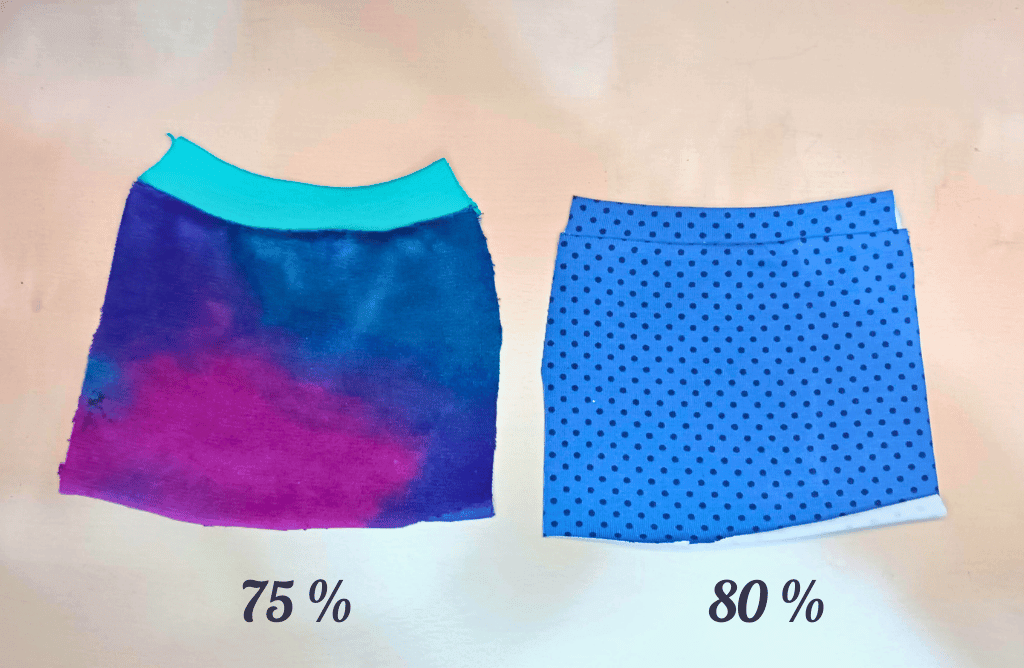
This is why we need the neckband shorter than the neckline, calculated as a percentage of the neckline measurement between 90-75%, depending on the stretchiness of the fabric and the width of the neckline. The wider the neckband, the more difficult it is to adapt to the curve.
It’s a bit like a mathematical puzzle, and let’s be honest, math isn’t everyone’s favorite pastime. The temptation to procrastinate or simply guess the length of ribbing can be strong. After all, who wants to spend hours crunching numbers when they could be sewing? But fear not! That’s where my Ribbing Calculator pops in to save the day. With just a few simple measurements and clicks, you can bid farewell to the guesswork and hello to perfectly tailored ribbing every time.
Introducing the Ribbing Calculator
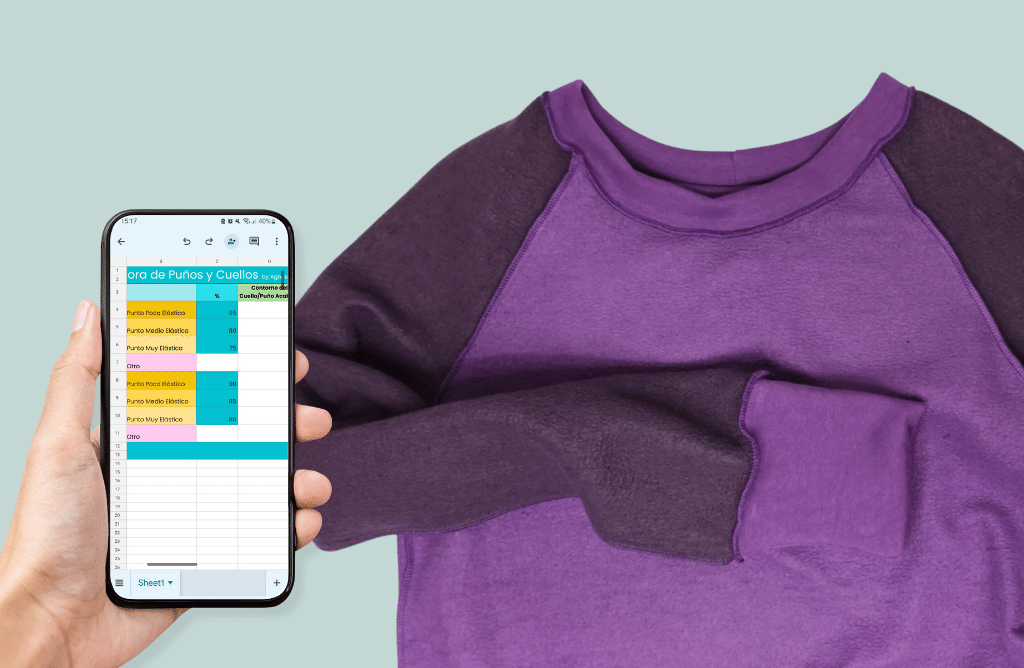
To simplify this process, I’m excited to introduce my Ribbing Calculator. This user-friendly tool takes the guesswork out of determining the correct length of ribbing for your projects. Whether you’re a seasoned pro or a beginner, this calculator makes it easy to achieve professional-quality results.
How to Calculate Ribbing for Your Project
- Access the Ribbing Calculator: Click here to sign up and download my Ribbing Calculator PDF. Inside the PDF, you’ll find a link to access the calculator in the Google Sheet file
- Enter Your Measurements: First, measure the finished neckline or hem of your garment. Be sure to subtract the seam allowance from this measurement for accuracy.
- Specify Seam Allowance: Determine the width and quantity of seam allowance needed for your project.
- Select Fabric Stretch: Choose the fabric type based on its stretchiness or enter a custom stretch percentage if needed.
- Get Your Ribbing Length: Once you’ve entered your measurements, the calculator will automatically determine the length of ribbing required for your project.
Check out the video below to see the Ribbing Calculator in action and learn how to use it correctly for your sewing projects!
Tailoring Ribbing to Your Fabric’s Stretchiness
Different fabrics have varying degrees of stretch, which can affect the fit and feel of your garment. The Ribbing Calculator offers options to accommodate various stretch percentages, ensuring a perfect fit every time. Additionally, within the calculator, there is a stretch guide to help determine the stretchiness of the fabric, allowing for precise calculations tailored to the specific material being used.
Tips for Sewing Perfect Ribbing

- For t-shirts and lightweight jersey tops, opt for ribbing with a medium to high stretch percentage for optimal flexibility and comfort.
- When sewing sweatshirts or heavier fabrics, consider ribbing with a lower stretch percentage to provide structure and support.
- Use the “Custom” field in the Ribbing Calculator to input a different stretch percentage if needed, and the calculator will make the calculation with the provided amount.
- Before committing to your main fabric and ribbing, make a small sample first. Even if you use a scrap piece of fabric, testing the percentage with your main fabric and ribbing in a 15 cm length fabric piece can help ensure you have chosen the right percentage.
- Remember, you can also utilize the Ribbing Calculator to calculate the length of elastics for underwear or swimwear projects.
Next Steps
Congratulations on mastering ribbing calculations for your stretch sewing projects! With my Ribbing Calculator, you’re well on your way to achieving the perfect fit and professional finish every time.
But why stop there? If you’re eager to explore more ways to create stunning garments, don’t miss out on my blog post highlighting the best online sewing pattern generators, explore our blog post on the best online sewing pattern generators.
To uncover more than just crafting made-to-measure garments using online sewing pattern makers, but also to delve into the art of pattern transformation for crafting one-of-a-kind styles, be sure to explore my Buddy Positive Pattern Playground.