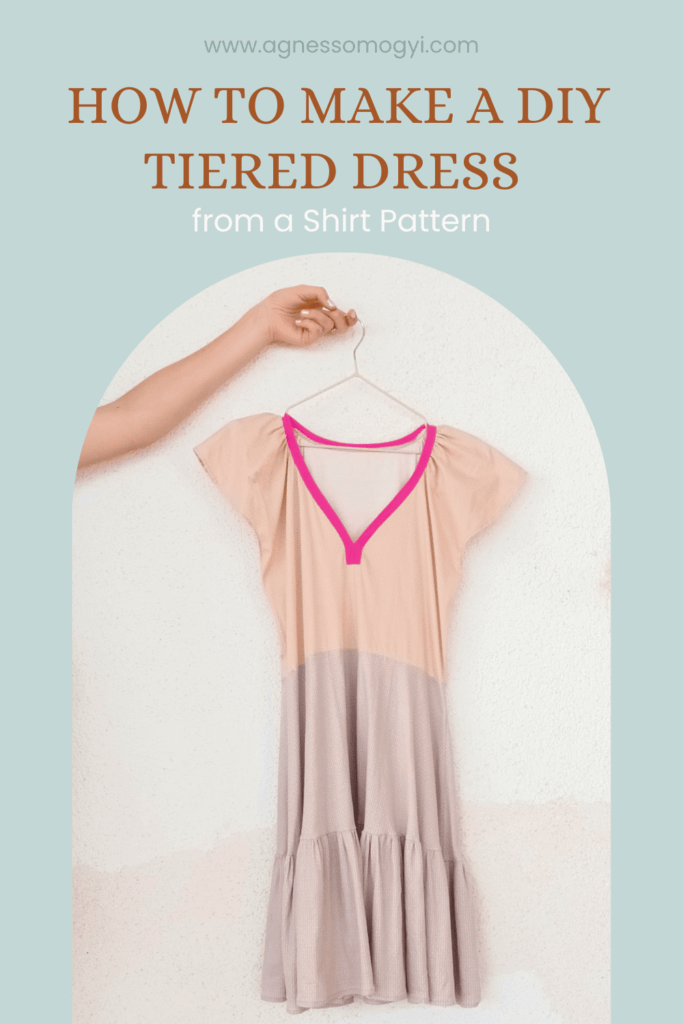
Hey there, creative sewists! Get ready for an exciting sewing adventure as we delve into the world of sewing pattern hacks! Today’s blog post is all about taking your skills to the next level with a show-stopping transformation. I’m about to share a game-changing sewing pattern hack that will have you twirling in style and turning heads.
Well, guess what? I’m here to show you how to turn the beloved Nephrite jersey top sewing pattern into a flowy and fabulous DIY tiered dress pattern that’s perfect for any occasion. But here’s the real magic: you can apply these steps to other top patterns too, turning them into stunning dresses that suit your style. Whether you’re a seasoned sewing pro or a newbie, this hack is tailored to make your sewing sessions both rewarding and enjoyable.
In just 8 easy-peasy steps, you’ll work your magic and bring that Nephrite jersey top pattern to life in a whole new way. From picnics to parties, this tiered dress will have you looking and feeling amazing. So, gather your scissors, thread, and a fun jersey fabric, because we’re about to embark on a creative journey that’s as exciting as it is fashionable. Ready to sew some enchantment?
Let’s dive into these 8 steps and transform that Nephrite jersey top into the tiered dress of your dreams!
Table of Contents
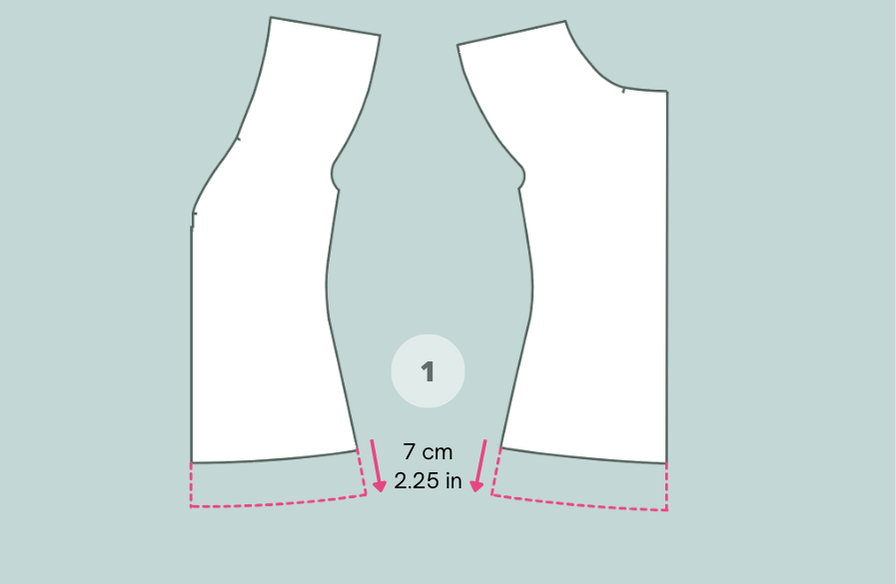
STEP 1 Clone and lengthen Your Nephrite Jersey Top Pattern
First things first, grab your Nephrite Jersey Top pattern and let’s make some magic happen. We want to keep our original pattern intact, so we’re going to make a copy. Using your favorite pattern tracing paper or a trusty printer, make a carbon copy of your Nephrite top pattern. Take this fresh copy and use a ruler to extend the hem by 7 cm (2.25 inches) on both the front and back. Keep the side seams at the same angle. You have the base for your tiered dress.
STEP 2 Define Front Skirt Cutline
Decide where you want the first part of the skirt to start. For me, it’s 14 cm (5.5 inches) from the end of the neckline. But feel free to choose any spot that you think will work best for your dress.
Once you’ve marked your chosen spot from the center front, draw a line parallel to the hem to the side. This is where you will cut your piece into the bodice and skirt.

STEP 3 Define Back Skirt Cutline
To determine where to cut the back, measure the front length to the back side seam and draw a line parallel to the hem and perpendicular to the back center. Cut both the front and back pieces at the new lines.
STEP 4-6 Add fullness to the skirt top
To create a nice flowing skirt with lots of fullness, we will first add fullness to the bottom of the skirt top using the slash and spread pattern construction method while keeping the top line the same.
First, cut the front into three pieces vertically. Measure the length of the line and divide it into 5 parts. The centerpiece should be one part and the other two 2 ⁄ 5 parts because the center is on the fold. So when you open it, it will also be a 2 ⁄ 5 part.
Now you have to open from the bottom of the pieces and open it by 5 cm leaving the top without separating. This way you add 10 cm at the bottom and nothing at the top. To get a more continuous fullness, we add half of the amount (2.5 cm) on the side. Draw a continuous line along the bottom and top curve to make it even.

STEP 7 Add seam allowances
Whenever you cut a pattern piece, you need to remember to add seam allowances to make sure your finished piece isn’t shorter than you wanted. So add seam allowances at the bottom of the bodice and the top of the skirt before you forget! The pattern has 1cm added to the construction seams by default, so you can add 1 cm or whatever you want. Just make sure you know how much you have added when you are sewing.
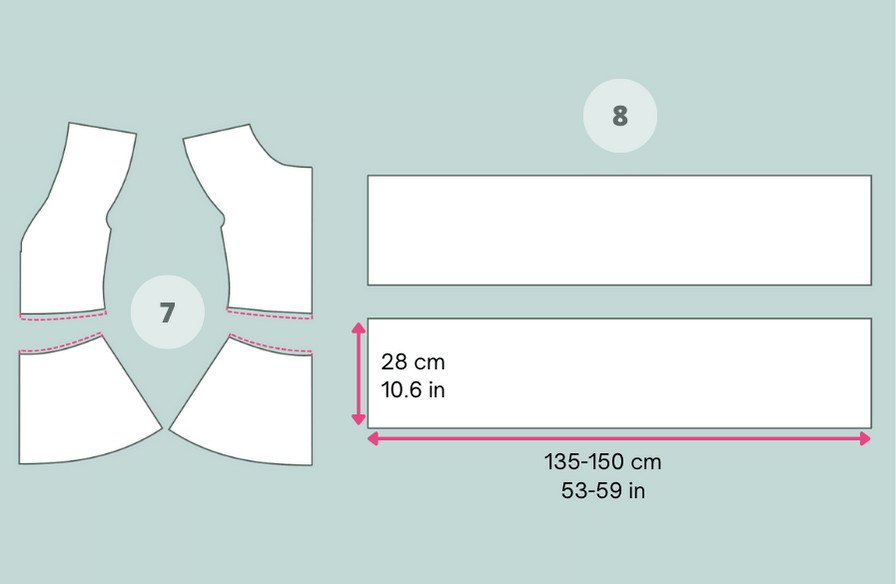
STEP 8 Create the Bottom Skirt Tier
To add fullness to the bottom of the skirt, we will add a gathered rectangle. The width of your piece can range from 135 cm to the full width of your fabric. The wider this piece is, the more fullness and gathering it will have. You will need two of this piece, one to sew to the front and one to sew to the back.
SEWING
When it comes to sewing the dress, there are not many changes from the top. You will sew most of the same way, except that you will join the skirt pieces before sewing the side seam. First, gather the rectangles at the top seam with two parallel gathering seams as shown in the sewing instructions. Then sew to the top skirt piece and sew to the bodice. And there you go!

TIPS for improving your new DIY tiered dress pattern
Feel free to customize your own Nephrite jersey dress. Make it your own! Here are some tips to make it unique.
- Use different colors for each piece, even create a gradient by using the same color in three different shades.
- You can make the bottom layer longer if you want a longer dress.
- Add another layer to make a long dress with even more fullness.
Congratulations, fellow sewing enthusiasts, on mastering the art of turning a simple Nephrite jersey top pattern into a stunning tiered dress. The steps we’ve taken together have unlocked a realm of dress-making possibilities.
As you proudly showcase your stunning tiered dress, remember that this transformation isn’t limited to just one pattern. Apply these techniques to other top patterns and create a wardrobe full of unique dresses that reflect your style.
If you liked this pattern hack, check out the other sewing pattern hack tutorials and subscribe to the mailing list to be the first to know about new tutorials and pattern releases. If you want to dive even deeper into pattern making, join the Buddy Positive Pattern Playground and learn everything you need to know about creating your own custom sewing patterns.